Showing posts with label Sewing. Show all posts

Monday, February 4, 2013

How many is too many ?

Spring has sprung and like a demented bunny I find myself skipping from one crafty project to another...
This morning I just had to stop and ask myself today's burning question - 'How many projects have I on the go?'  and the a nswer - 'Far too many !!'

Its time for me to curb my enthusiasm for all things crafty and finish a few of these ....


Having finally finished the wavy blanket for my daughter I instantly started on a blanket for my son. I'm using up lots of (un-girlie) colours and two HUGE skeins of grey yarn I bought in Aldi last winter! The pattern I'm following is the granny stripe from Lucy over in Attic 24.

Next up some wreaths I'm covering in funky French yarn. I'm thinking about making them into spring wreaths or Valentines wreaths - I cant decide which!


I have this lovely apple vinyl thats in the process of being made into a bag for a surprise birthday gift in February ..


And a flowery spring bag all cut out ready to sew...


Yesterday I treated myself to this months Molly Makes Magazine and couldn't resist making a start cutting out this cute little Racoon in front of the telly last night...


And last but not least my lovely purple cardigan I started back in September is STILL waiting for sleeves and buttons !

I'm all for crafty enthusiasm but this is getting out of hand!
I think the ideal number of crafty projects to have on the go at any time is probably 2 - one big one and one small (portable) one. Maybe when I finish all these tasks above I will start to take my own advice and make do with two projects at a time !

How many craft projects to you have on the go ? I'd love to hear I'm not alone!

Thanks for visiting & come back soon !

Love Siubhan x x x


Tuesday, January 15, 2013

Scrappy Scatter Cushion - Free Tutorial

Hello there!

In November of last year I made my first Scrappy Scatter Cushion 
Back then I did promise you a tutorial for this project
and today I made another

I also finally got around to taking some pictures for this fun and easy cushion cover.
Here you go....

Scrappy Scatter Cushion Tutorial


What your going to need -

A cushion pad - (mine was 12" x 12")
Some scraps of fabric for front
Single piece of fabric large enough for back
Some ribbon
Scissors or a cutting mat & rotary cutter
Thread
Sewing machine

Step 1 -

pull out your scrap stash (here's mine!)


& pull out some strips of fabrics that take your fancy and look good together.
Its nice to have a mix of patterned and plain and also think about mixing different textures.


Step 2.

Now iron those scraps, you want them to be a bit longer than your cushion.
Cut the scraps into long triangle shaped pieces and lay them out in a pleasing pattern.


Step 3 

Time to start sewing!
Lay your strips RST (Right Sides Together), pin and sew a single seam.


After you sew a single seam, open it out and iron it flat.


Move along your collection of strips, laying Right Sides Together


& ironing the seams flat as you go.


When you've finished all that sewing & ironing you should have something like this...


Step 4 

Ribbon ! Lay some co-ordinating ribbon on top of your newly sewn scrappy fabric until your happy with the look.


Back to the sewing machine !
Sew the random ribbons in place (you can use one of your fancy stitches if you like)


Now your ready to trim your scrappy fabric to size ....
I trimmed mine to a 13" square (1 inch bigger than my cushion pad )


Step 5.

Now lets tackle the back. Its a simple envelope closure.
I cut two rectangles 13" x 9" one of my rectangles had a selvedge so no need to hem (yayy!)
(but if yours has no selvedge you will need to fold one long edge twice and hem)
For a plain back you can hem both rectangles on the long sides


but in your scrap search you may have found a piece that you can use to trim the cushion closing.
If you choose to trim the back heres the steps
You need a piece of co-ordinating fabric arrrox 1 & 1/2 inch deep.
Fold the fabric in half longways and press


Open out the strip, fold the edges in towards the centre and press again.


Pin the fabric strip along the long side of one of your rectangles, encasing the raw edge.


Finish off with a double row of top stitch.


Step 6 

Nearly there !
Lay your cushion cover down as below , pin and sew around the edges.


Step 7.

Trim the excess and snip the corners. Turn the cover right side out and your done !


Here's a view of the back ...


Now if you like you can embellish the cover a little more, I've added one of last weeks felt flowers


(& if you do make one I would LOVE to see it - why not post a picture on my Facebook Page?!)
Thanks for visiting & do come back soon !


Love Siubhan x x x


Sunday, December 30, 2012

The Perfect Purple Pinny

Hello there,
Nope! This is NOT a Christmassy or New years themed post (I'm wayyy too disorganised for that !!)
Just a little post to share with you one of my little projects of the past week.
Its a perfect purple pinny made from some vintage Laura Ashley fabric I've had in my stash for at least 15 years and some purple polka-dot quilting cotton I picked up recently.


I've challenged myself to do so many new things with a needle and thread this year but one thing I haven't cracked yet is making clothes (the more observant of you may have noticed how there was no follow up to this particular post!!).
This apron is so sweet and at a stretch I do think that it could possibly be classified as clothing....sort of !!!
I came across the pattern in Issue 17 of Mollie Makes (What a great magazine!)
The pattern features in a book called Sewing Made Simple by Tessa Evelegh

Here's what her vintage style apron looked like ... (on a lovely sunny day!)


And here's what my effort turned out like .....(on a chilly winters eve!)


I made a few changes from the pattern as printed in the magazine ; like leaving out the ric-rac (I had none)...
And adding in a few folded pleats. I added interfacing to the top of the bib and the waistband
(just because I'm an interfacing addict!)

It was my first ever attempt at gathers , I tried to do the 'pull the back thread' thingy
 you seem to read about in EVERY sewing book !.I failed miserably
and in the end I just hand sewed the gathers in place before machine stitching in place.
I had lots more of the floral fabric than the dotty one so I made up all the ties with a dual colour scheme !
(dotty one side - floral on the other!) I think they look pretty sweet!
I also finished off the tie ends at a 45 degree angle - I just think it looks nicer. than square ends. 

It was a lovely quick project and I would say it took only a couple of hours to complete. The pity is its a bit to pretty to get dirty! I was thinking it might be fun to do a smaller version too for a mommy & daughter gift.....or maybe add frills to some rubber gloves to match ! Or maybe tea-towels to match !!
What do you think ? 
Have you ever made an apron ? If so, I'd love to see it!

Thanks for visiting , have a happy New Year & do come back soon !

Love Siubhan x x x

Monday, December 10, 2012

The Cutest Bag I've Ever Made!

Hi There !
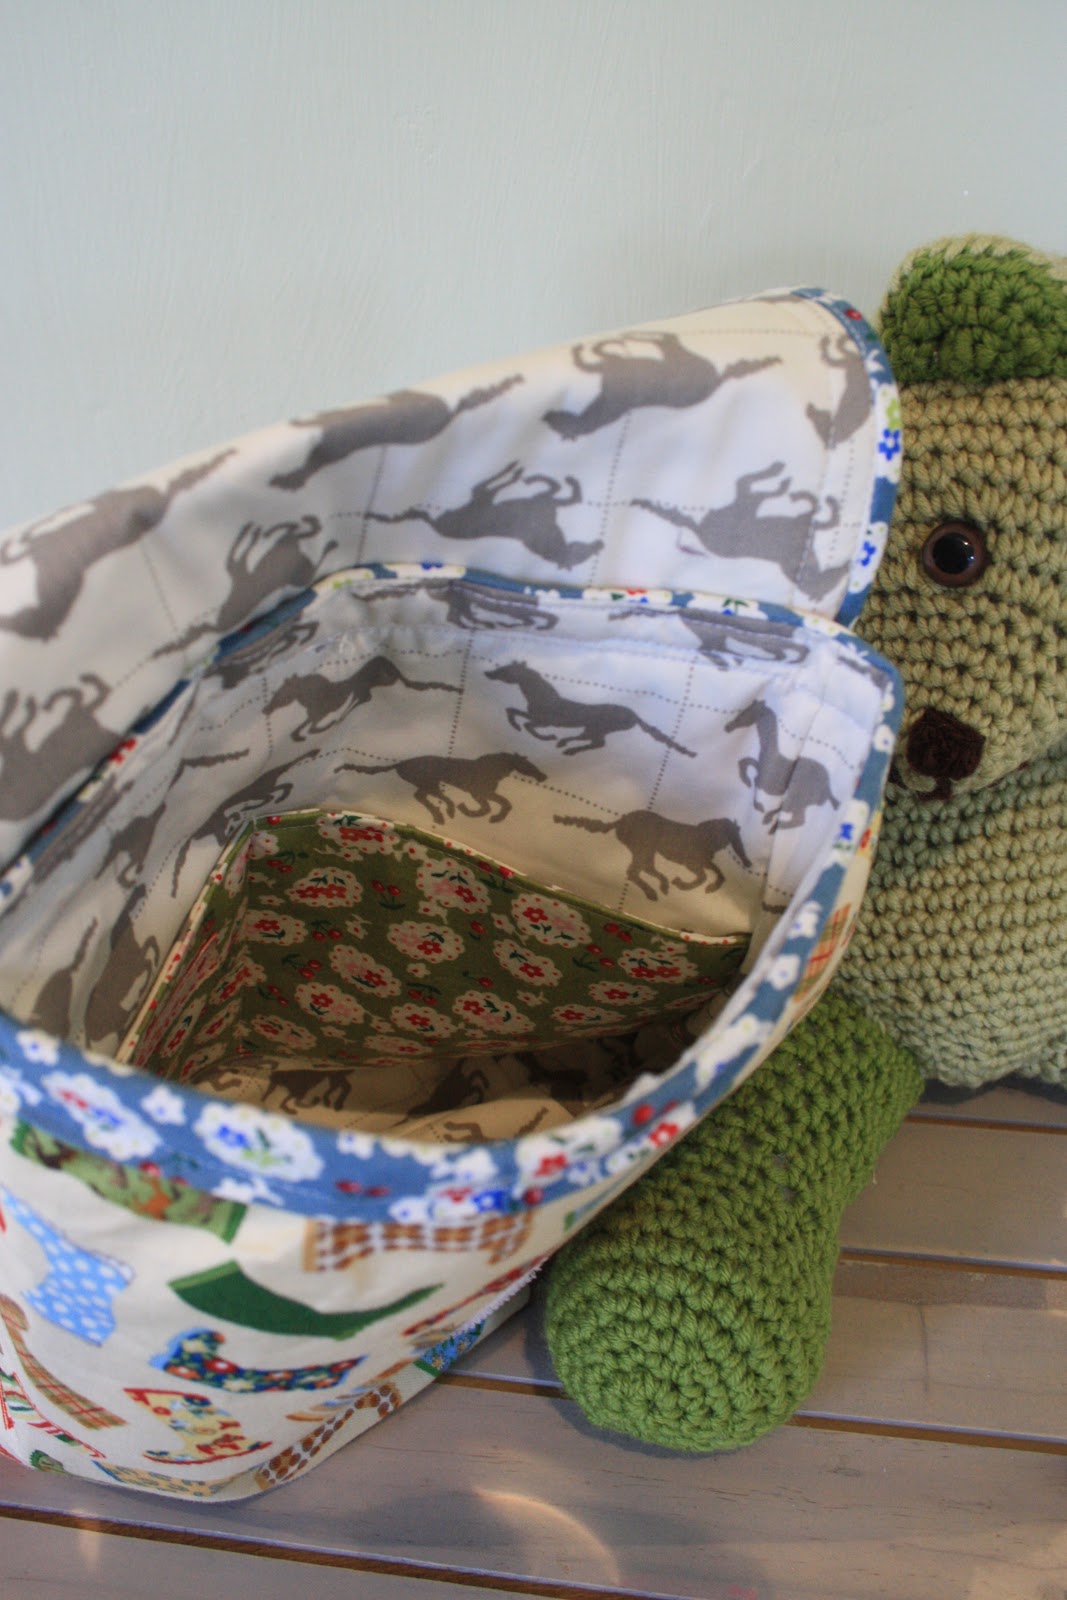
After a super restful weekend I've been a busy bunny this morning finishing off a custom order for a friends daughter. This lucky little girl will be receiving what is now Officially 'The Cutest Bag I have EVER made' !!! Taaa Daaaaa....

Wellie-tastic fabric!

I had lots of fun picking the fabrics for this project and it was my first time using complicated equipment like dog clips , double sliders & D-hooks. I'm simply D-lighted with how it turned out !!!

The dog clips, D-rings & slider give it a very professional finish.

How the straps attach at the back.

 The new owner of this bag loves horses so I picked this funky wellie print for the exterior and  I've lined the bag with some galloping horses to make her smile every time she opens up her new bag.

Sling bag - there are 2 handy pockets inside too.
 I followed the pattern for the Cross Body Purse in the 'Sew Serendipity Bags' Book by Kay Witt.
This is the third book I've made from this book and by far the easiest (once I got over my fear of D-rings!).
I followed the pattern pretty much to the letter except for the fact that I added a velcro closure rather than a super expensive clasp.


I'm hoping that mom & daughter are happy with the finished bag ... I sure am !


Thanks for visiting & come back soon !

Love
Siubhan x x x

Tuesday, November 27, 2012

Free Tutorial - County Christmas Cushion

Hi folks !
Its beginning to feel a lot like ......
Christmas decoration making time !!! yayy!
Well I'm been super busy with my lovely crochet snowflakes over the past week
(think I may even be able to crochet them in my sleep at this stage!)
and I love them soooo much thought I might just come up with an idea or two
to use them in other festive ways.
I've also been scheming of ways to use the ribbon I received from the lovely people
at Abakhan through the tutorial exchange at Totally Tutorials.

So here's a little tutorial I put together this morning for a


Country Style Mini Pillow Christmas Decoration With Ribbons & Crochet
(he! he! now that's a mouthful !) Its a super easy and fun little project - took me about half an hour


Here's what your going to need -

Some yarn & a crochet hook
Hessian or Burlap 2 pieces - mine were 7in x 9in
Some scraps of Christmas Ribbon
Wadding or stuffing (I used some leftover stuffing from my scatter cushion)
Sewing needle & thread

Lets get started !

2 pieces of hessian (burlap) , mine were 7in wide x  9in high but you can use any size you fancy.

Lay your Christmas ribbon down across one piece in a random pattern, pin it all down when your happy :)
Pin about 4 inches of ribbon in the centre of the top of your burlap (this will be your hanger)
Lay your pieces right sides together and whip out the machine & stitch all round the cushion leaving a 3 inch gap at the bottom for turning out and stuffing.
I like to double stitch (go over it twice) as the weave is so open on the material)
Trim the excess & trim your corners
Now carefully remove all your pins & turn right side out , carefully push out the corners.

Time for some Christmas Stuffing ( he he ! Couldn't resist! )

When your cushion is stuffed , hand sew the opening closed with coordinating thread.
Ahhh! Now we're getting somewhere !
 Next up the mini crochet snowflake...
'Whaaa!!' I hear you cry 'I can't crochet!!!'
Well that's why I'm here ! Its easy!!

Grab a crochet hook & some yarn you only need three stitches to make a snowflake -
Chain (C)
Slip Stitch (SS)
& heres where things get a little hairy! one more simple stitch called
Double Crochet (DC) (UK) or Single Crochet (SC) (USA)

You can learn how to make these 3 stitches HERE, HERE and HERE
Got it ? Great then lets make a mini snowflake! ...

Chain 4 
Join your chain with a slip stitch (ss) to form a loop.
Working into the loop chain 2, 1 Double crochet (US- Single), Chain 3 
2 Double Crochet in the loop (as above) then chain 3 - do this 3 more times 
 then SS into the 2nd chain of your initial ch 2. now you've formed a cute little 5 pointed star shape.
Slip stitch into the closest loop (formed by your chain 3 in the previous round) & do the following-
DC, Chain 3, DC, Chain 5, DC, Chain 3, DC
Now move onto the next loop and do it all again !
DC, Chain 3, DC, Chain 5, DC, Chain 3, DC
Continue in each of the 5 loops ...
SS into the base of your first DC and hey presto ! Your done !!

You can at this point block your crochet snowflake if you like. The difference between blocking & not blocking is demonstrated in the photo of a larger snowflake below - the snowflake on the right has been blocked.

& this is how you do it - pin your snowflake open on a folded towel (I use some foam behind my towel to save the table). Spray with water or a spray starch & then leave to dry. Its a simple as that !


Sew that critter on to the front of your mini cushion & wayyy hey!!
Your done ! Now all you've to do is decide where to hang your creation !
It will look great hanging on a door handle or on a hook and what a lovely Christmas gift it would make !


Thank you for visiting & do come back soon !

Love Siubhan x x x


Related Posts Plugin for WordPress, Blogger...